
WO Mic Tutorial: Complete Setup Guide for Windows, Android, and iPhone
If you’ve installed WO Mic and are ready to set it up, this guide shows you how to connect your Android phone or iPhone to a Windows PC, configure the recommended settings, and start using your phone as a microphone.
WO Mic supports four connection methods: USB, Wi-Fi, Bluetooth, and Wi-Fi Direct. You’ll learn how each method works, when to use it, and how to optimize it for the best balance of latency, stability, and audio quality. The guide also covers the recommended settings for gaming, streaming, online meetings, and voice recording, along with setup instructions for Discord, Zoom, OBS Studio, Audacity, and Microsoft Teams.
Before You Begin: Make sure you’ve installed the WO Mic mobile app, WO Mic Client, and the WO Mic Virtual Device Driver on your Windows PC before following this tutorial.
WO Mic Setup Overview
| Item | Details |
|---|---|
| Supported Devices | Windows, Android, iPhone |
| Connection Methods | USB, Wi-Fi, Bluetooth, Wi-Fi Direct |
| Setup Time | Approximately 5–10 minutes |
| Difficulty | Beginner Friendly |
| Requirements | WO Mic Client, Virtual Device Driver, WO Mic Mobile App |
How to Set Up WO Mic?
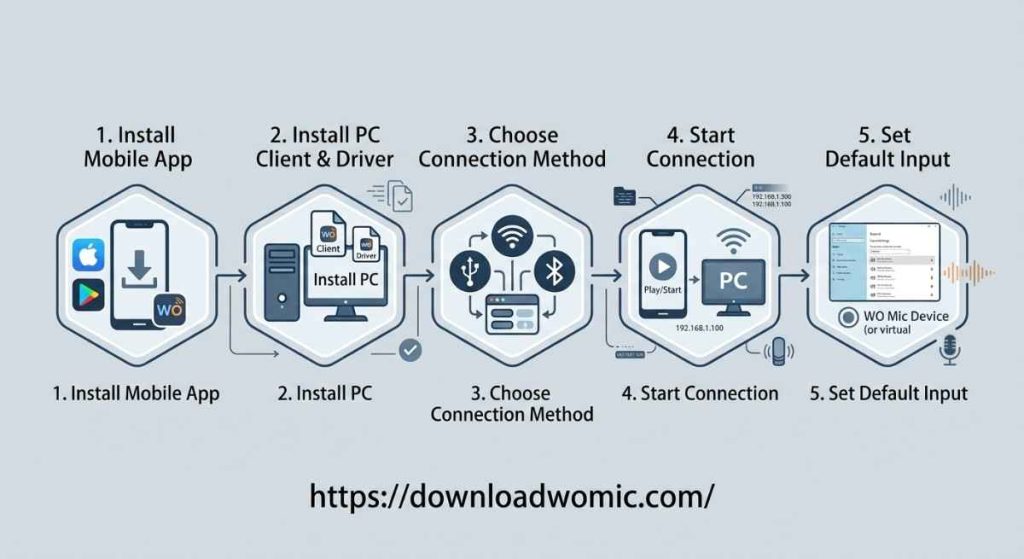
Follow these five steps to install WO Mic, connect your phone, and start using it as a microphone on your Windows PC.
| Step | Action |
|---|---|
| 1 | Install WO Mic Client on Windows. |
| 2 | Install the WO Mic Virtual Device Driver. |
| 3 | Install the WO Mic App on Android or iPhone. |
| 4 | Connect your phone using USB, Wi-Fi, Bluetooth, or Wi-Fi Direct. |
| 5 | Select the WO Mic Device as your microphone in Windows and your applications. |
How WO Mic Works?
WO Mic turns your Android phone or iPhone into a virtual microphone for your Windows PC. Your voice is captured by your phone, transmitted to your computer through the selected connection method, and recognized by Windows as a standard recording device that applications can use.
The audio passes through these components:
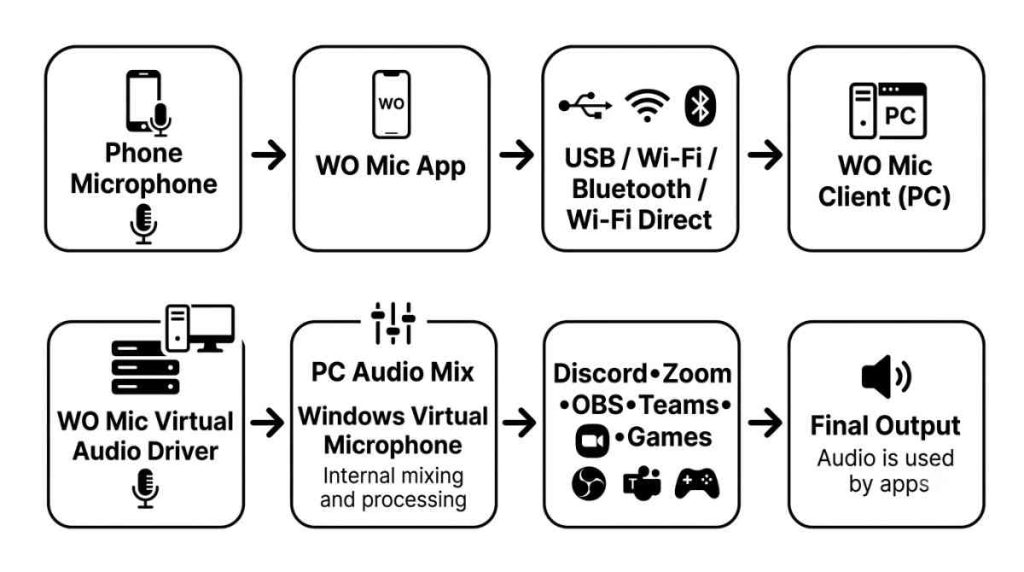
Here’s what each component does:
- Phone Microphone captures your voice.
- WO Mic Mobile App sends audio to your computer.
- Connection Method transfers the audio using USB, Wi-Fi, Bluetooth, or Wi-Fi Direct.
- WO Mic Windows Client receives the incoming audio.
- WO Mic Virtual Device Driver creates a virtual microphone inside Windows.
- Applications like Discord, Zoom, OBS Studio, Audacity, and Microsoft Teams use that virtual microphone as their input device.
Once connected, Windows detects WO Mic as a regular microphone, allowing you to use it with most voice and recording applications.
How to Connect WO Mic to Your Windows PC
WO Mic supports four connection methods. Choose the one that best fits your needs, whether you prioritize low latency, wireless convenience, or a connection without a router.
Method 1: Connect via USB (Recommended)
Best for
- Gaming
- Live streaming
- Podcast recording
- Voiceovers
- Online communication
- Professional recording
USB is the fastest and most reliable way to connect the WO Mic. Since audio travels directly through a cable instead of a wireless connection, it provides the lowest latency, highest stability, and best overall sound quality.
It is the recommended option for users who need real-time voice communication, such as gamers, streamers, and content creators.

Requirements
Before connecting through USB, make sure you have:
- USB data cable (not charging-only)
- USB Debugging enabled on Android
- WO Mic Client installed
- WO Mic Virtual Device Driver installed
- ADB Driver (if required by your Android device)
USB connections are primarily supported on Android devices. If you’re using an iPhone, connect via Wi-Fi unless your device and iOS version support USB.
Steps
- Connect your Android phone to your PC using a data-capable USB cable.
- Enable USB Debugging in Android’s Developer Options.
- Open the WO Mic app on your phone.
- Select USB as the transport method.
- Open the WO Mic Client on your computer.
- Click Connection → Connect.
- Select USB and click OK.
After a few seconds, Windows should recognize WO Mic Device as a recording microphone.
Tip: If Windows doesn’t detect your phone, verify that USB Debugging is enabled and confirm you’re using a USB cable that supports data transfer.
After a successful connection, the WO Mic Client status changes to Connected, and WO Mic Device appears as an available recording device in Windows.
Advantages
- Lowest audio latency
- Most stable connection
- Excellent voice quality
- No Wi-Fi interference
- Perfect for long gaming or recording sessions
Limitations
- Requires a USB cable
- USB Debugging must be enabled on Android devices
Method 2: Connect via Wi-Fi
Best for
- Zoom meetings
- Microsoft Teams
- Discord
- Voice chat
- Everyday communication
- Wireless convenience
Wi-Fi lets you use WO Mic completely wirelessly while maintaining good audio quality. Both your phone and computer must be connected to the same wireless network.
Although latency is slightly higher than USB, Wi-Fi offers an excellent balance between convenience and performance for everyday use.
Requirements
You’ll need:
- Phone and PC connected to the same Wi-Fi network
- WO Mic Client
- WO Mic mobile app
Steps
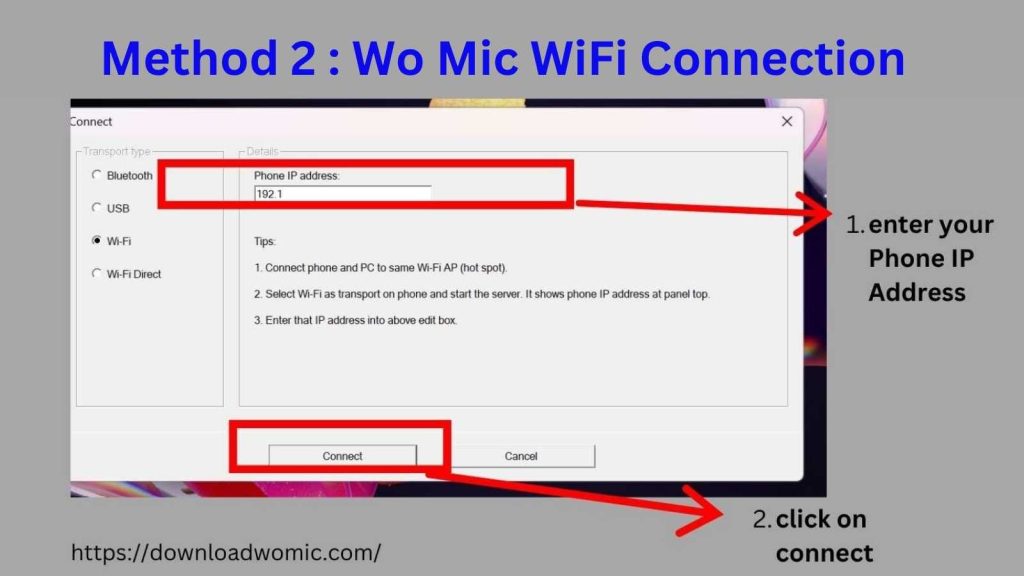
- Connect both devices to the same Wi-Fi network.
- Launch the WO Mic app.
- Choose Wi-Fi as the transport method.
- Tap Start to display your phone’s IP address.
- Open WO Mic Client on Windows.
- Select Connection → Connect.
- Choose Wi-Fi.
- Enter the IP address displayed on your phone.
- Click OK.
The connection should be established within a few seconds.
Tip: A strong Wi-Fi signal improves connection stability and reduces audio interruptions.
Advantages
- Completely wireless
- Easy to set up
- Good voice quality
- No cables required
Limitations
- Requires both devices to share the same Wi-Fi network
- Slightly higher latency than USB
- Weak Wi-Fi signals can affect stability
Method 3: Connect via Bluetooth
Best for
- Portable setups
- Casual voice chat
- Traveling
- Quick wireless connections
Bluetooth allows you to use WO Mic without cables or a Wi-Fi network. It’s a convenient option when portability matters more than achieving the lowest latency.

Requirements
Before connecting:
- Enable Bluetooth on both devices.
- Pair your phone with your Windows PC.
- Install the WO Mic Client and mobile app.
Steps
- Pair your phone with your Windows PC through Bluetooth settings.
- Launch the WO Mic app.
- Select Bluetooth as the connection method.
- Open the WO Mic Client.
- Click Connection → Connect.
- Choose Bluetooth.
- Select your paired phone.
- Click OK.
Once connected, perform a microphone test before joining meetings or recording.
Advantages
- No router required
- Wireless convenience
- Easy setup after pairing
- Great for portable use
Limitations
- Higher latency than USB and Wi-Fi
- Shorter wireless range
- Signal interference may occasionally interrupt audio
Method 4: Connect via Wi-Fi Direct
Best for
- Places without a router
- Direct phone-to-PC communication
- Temporary wireless setups
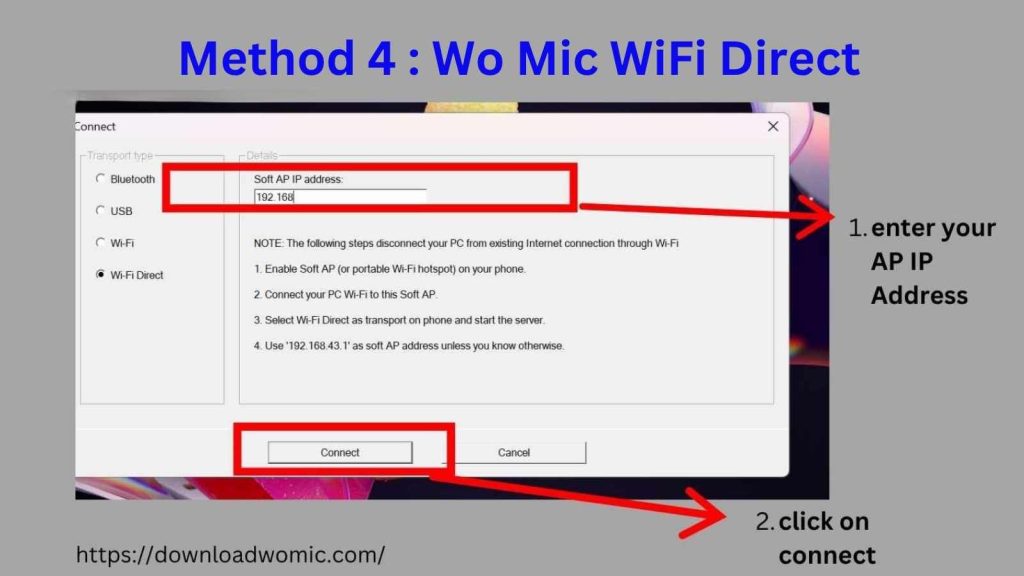
Wi-Fi Direct allows your phone and computer to communicate directly without connecting to a traditional wireless router. It combines the convenience of wireless connectivity with better performance than Bluetooth in many situations.
Requirements
- Device that supports Wi-Fi Direct
- WO Mic Client
- WO Mic mobile app
Steps
- Enable Wi-Fi Direct on your Android device.
- Connect your PC to the Wi-Fi Direct network.
- Open the WO Mic app.
- Select Wi-Fi Direct.
- Use the IP address displayed in the app to connect from the WO Mic Client.
Keep in mind that Wi-Fi Direct availability depends on your phone manufacturer and Android version.
Advantages
- No router required
- Faster than Bluetooth in many cases
- Stable wireless performance
Limitations
- Setup is more advanced than standard Wi-Fi
- Compatibility varies across devices
Which Connection Method Should You Choose?
The right connection method depends on how you plan to use WO Mic.
| Connection Method | Best For | Stability | Latency | Cable Required |
|---|---|---|---|---|
| USB | Gaming, Streaming, Recording | ⭐⭐⭐⭐⭐ | Lowest | ✅ Yes |
| Wi-Fi | Meetings, Discord, Everyday Use | ⭐⭐⭐⭐☆ | Low | ❌ No |
| Bluetooth | Casual Voice Chat, Travel | ⭐⭐⭐☆☆ | Medium | ❌ No |
| Wi-Fi Direct | Wireless Without a Router | ⭐⭐⭐⭐☆ | Low | ❌ No |
Supported Windows Versions
WO Mic is compatible with most modern Windows operating systems. As long as you’ve installed the latest WO Mic Client and Virtual Device Driver, you can use your phone as a microphone on the following versions:
- Windows 11
- Windows 10
- Windows 8.1
- Windows 7
For the best performance, keep both the Windows client and mobile app updated to the latest version.
Configure WO Mic Settings
After successfully connecting WO Mic, you can fine-tune the following settings to improve sound quality, reduce latency, and optimize performance for gaming, meetings, streaming, or recording.
1. Choose the Audio Source
WO Mic lets you choose which microphone on your phone is used to capture audio.
Default Microphone
This uses your phone’s primary microphone and is the recommended option for most users. It provides balanced voice quality for calls, meetings, gaming, and everyday communication.
Best for:
- Zoom meetings
- Discord
- Microsoft Teams
- General voice chat
Rear Microphone
On supported Android devices, a secondary microphone near the rear camera may provide clearer recordings when the phone is placed farther away.
Best for:
- Voiceovers
- Tutorials
- Podcast recording
Microphone Modes
Some Android devices offer multiple microphone processing modes.
These modes can change how your phone filters background noise or processes your voice. Since performance varies by device, it’s worth testing each mode to determine which delivers the clearest sound.
Recommendation: If you’re unsure which option to choose, use the Default Microphone, as it provides the most consistent results across devices.
2. Set the Sample Rate
The sample rate controls how audio is captured and transmitted between your phone and computer.
It matches the default audio format used by most communication and recording applications, ensuring broad compatibility and clear voice quality.
Recommended Sample Rate
- 48 kHz – Best for gaming, streaming, meetings, podcasts, and recording.
3. Select the Audio Channel
WO Mic transmits audio using Mono.
Since voice recording only requires a single audio source, mono keeps speech clear while reducing bandwidth usage and maintaining a stable connection.
For nearly all users, Mono is the ideal choice.
4. Adjust the Buffer Size
The buffer size determines the balance between latency and connection stability.
Small Buffer
- Lowest latency
- Fastest response
- Best for gaming
- May produce crackling on slower computers or unstable Wi-Fi
Default Buffer
- Balanced performance
- Recommended for most users
- Good combination of speed and stability
Large Buffer
- Highest connection stability
- Slightly higher delay
- Useful on weak Wi-Fi networks
Tip: If you hear crackling, stuttering, or audio dropouts, increase the buffer size one level and test again.
Audio Controls
WO Mic includes several built-in audio controls that allow you to manage microphone behavior without disconnecting your session. These controls adjust the microphone input within the WO Mic mobile app, not the Windows sound settings.
Mute / Unmute
The Mute option temporarily stops microphone transmission while keeping the connection active.
When you’re ready to speak again, simply tap Unmute to resume audio instantly.
This is especially useful during:
- Online meetings
- Live streams
- Voice chats
- Podcasts
Volume Control
Volume Control adjusts your microphone’s recording level before audio reaches your computer.
If your voice sounds too quiet or too loud, increase or decrease the input level until it sounds natural.
For the best results:
- Avoid setting the volume too high, as it may introduce distortion.
- Keep the microphone approximately 6–8 inches from your mouth.
- Speak at a consistent volume.
Play in Speaker
The Play in Speaker option lets you hear audio through your phone’s speaker while the microphone remains active.
This feature is useful when:
- Testing microphone quality
- Verifying audio before joining a meeting
- Checking volume levels
- Troubleshooting microphone issues
Advanced Connection Settings
WO Mic includes several advanced settings that control communication between the mobile app and the Windows client.
Most users don’t need to change these options, but understanding them can help when troubleshooting connection problems.
Wo Mic Control Port
The Control Port manages communication between your phone and the WO Mic Windows Client.
Default Value: 8125
Normally, you should leave this setting unchanged.
Only modify the Control Port if:
- Another service is already using port 8125.
- You’re troubleshooting connection issues
- You’re following advanced network configuration instructions
Changing this value unnecessarily may prevent WO Mic from connecting.
Media Port
The Media Port carries your live microphone audio between your phone and computer.
It works together with the Control Port to ensure voice data is transmitted correctly.
Like the Control Port, this setting should remain at its default value unless you’re troubleshooting a specific issue.
Connection Stability
Maintaining a stable connection is essential for uninterrupted meetings, streaming, and voice communication.
WO Mic includes features that help reduce interruptions during long sessions.
Auto Reconnect
Auto Reconnect automatically restores the connection if it’s temporarily interrupted.
Instead of reconnecting manually, WO Mic attempts to resume communication whenever possible.
Benefits
- Reduces interruptions
- Saves time
- Improves reliability during long wireless sessions
- Helpful for meetings and live streaming
Flash Window
When enabled, Flash Window brings the WO Mic Windows Client to the foreground whenever an important connection event occurs.
Examples include:
- Connection established
- Connection lost
- Reconnection notifications
This makes it easier to notice important status changes without constantly monitoring the application.
Best WO Mic Settings
The ideal configuration depends on how you use WO Mic. Below are the recommended settings for the most common scenarios.
Best Settings for Gaming
Gaming requires the lowest possible latency, so teammates hear your voice instantly.
| Setting | Value |
|---|---|
| Connection | USB |
| Sample Rate | 48 kHz |
| Buffer Size | Small |
| Microphone | Default Mic |
USB delivers the fastest response time and minimizes audio delay, making it the preferred option for competitive gaming.
Best Settings for Online Meetings
Video conferencing prioritizes stability and consistent voice quality over extremely low latency.
| Setting | Value |
|---|---|
| Connection | Wi-Fi |
| Sample Rate | 48 kHz |
| Buffer Size | Default |
| Microphone | Default Mic |
- Zoom
- Microsoft Teams
- Google Meet
- Skype
- Discord
Best Settings for Recording
When recording podcasts, tutorials, or voiceovers, audio clarity takes precedence over ultra-low latency.
| Setting | Value |
|---|---|
| Connection | USB |
| Sample Rate | 48 kHz |
| Buffer Size | Default |
| Microphone | Rear Mic (if supported) |
For even better recordings:
- Record in a quiet room.
- Keep the phone 6–8 inches from your mouth.
- Reduce background noise.
- Avoid touching the phone while recording.
Use WO Mic with Popular Applications
After successfully connecting your phone to your Windows PC, the final step is selecting WO Mic Device as the microphone in the application you want to use.
Most communication and recording software automatically detects the virtual microphone created by WO Mic.
1. Use WO Mic with Discord
Discord is one of the most popular applications for voice chat among gamers and online communities
Steps
- Open Discord.
- Click the Settings (gear) icon.
- Select Voice & Video.
- Under Input Device, choose WO Mic Device.
- Use Discord’s Mic Test to verify your voice is being detected.
- Save your settings.
If Discord still uses another microphone, ensure WO Mic Device is selected as both the Windows default recording device and Discord’s input device.
2. Use WO Mic with Audacity
WO Mic is also suitable for recording voiceovers, tutorials, podcasts, and spoken notes.
Steps
- Open Audacity.
- Select WO Mic Device from the recording device list.
- Click Record.
- Speak into your phone.
- Review the recording to confirm the audio quality.
Recording a short sample first helps you adjust microphone placement and input volume before creating longer recordings.
3. Use WO Mic with OBS Studio
Steps
- Open Microsoft Teams.
- Go to Settings → Devices.
- Under Microphone, select WO Mic Device.
- Start a Test Call to verify everything is working correctly.
4. Use WO Mic with Microsoft Teams
Microsoft Teams recognizes WO Mic just like a standard USB microphone.
Method 1: Set as Default Microphone
- Open OBS Studio.
- Go to Settings → Audio.
- Set WO Mic Device as the microphone.
Method 2: Add as Audio Input Capture
- Open OBS.
- In the Sources panel, click +.
- Select Audio Input Capture.
- Create a new source.
- Choose WO Mic Device.
- Click OK.
Speak into your phone and verify that the audio meter responds before starting your stream or recording.
Need Help Troubleshooting?
If the WO Mic isn’t connecting, isn’t detected, there’s no sound, or you’re experiencing audio delay or driver issues, don’t worry. Visit our WO Mic Troubleshooting Guide for step-by-step solutions to the most common connection, driver, and audio problems.
Verify the WO Mic Driver
If WO Mic still isn’t working correctly, verify that Windows has installed the virtual microphone properly.
Step 1
Open Device Manager.
Step 2
Expand Sound, video and game controllers.
Step 3
Locate WO Mic Device.
Step 4
Open its properties.
Step 5
Status: This device is working properly.
If the device is missing or displays an error message, reinstall the WO Mic Virtual Device Driver, then restart your computer before connecting again.
Best Practices
Following a few simple recommendations can improve sound quality, reduce connection problems, and provide a better overall experience.
- Use USB for gaming, streaming, podcasts, and professional recording where low latency is essential.
- Choose Wi-Fi for online meetings and everyday voice communication.
- Use Bluetooth only when portability is more important than latency.
- Select Wi-Fi Direct when you need a wireless connection without access to a router.
- Keep your phone charged during long recording or meeting sessions.
- Position your phone approximately 6–8 inches (15–20 cm) from your mouth for clear voice capture.
- Record or communicate in a quiet environment whenever possible.
- Keep both the WO Mic Client and mobile app updated to the latest version.
- Verify that the WO Mic Virtual Device Driver is installed correctly before troubleshooting more advanced issues.
- Test your microphone before joining important meetings, live streams, or recording sessions.
- Disable battery optimization on your phone during long wireless sessions to help prevent unexpected disconnections.
Final Thoughts
WO Mic makes it easy to use your Android phone or iPhone as a microphone for your Windows PC. Simply choose the connection method that best fits your needs—USB for the lowest latency, Wi-Fi for wireless convenience, or Bluetooth and Wi-Fi Direct for flexible portable setups.
With the right settings and WO Mic Device selected in your applications, you’re ready to use your phone for gaming, online meetings, streaming, recording, and voice chat. If you run into any issues, check our WO Mic Troubleshooting guide for advanced solutions.